 A common use case for real-time messaging between web clients is to keep something in synch. For example, in the Sensei tool that we built for one of our clients, each remote participant in an agile retrospective should be able to see the votes and comments made by other remote participants, and a moderator needs to be able to control the flow the of the meeting and advance the entire distributed group through each step of a process at the same time.
Another example that we’ve built out is for a webinar tool. We built a simple webinar tool that incorporates video and audio chat using WebRTC, and made that the basis of an e-book we’ve written for «Building Real-Time Web Applications using Node.js, Pub/Sub networks, and WebRTC.»
One of the features of a webinar tool is that when the Presenter changes the slide being presented, that same slide (in this case an image) needs to be displayed in the browser of all the participants.
The following is a sample chapter from our e-book that walks you through the code for how we keep the slides in synch in this webinar tool. You can see the complete project available freely on GitHub, and of course you can pick up a copy of the book in order to get our full explanation of how to build your own real-time applications.
What you’re building
The following video gives you a quick tour of what you’re going to build in this chapter.
SynchronizedSlidesExample from Arin Sime on Vimeo.
Chapter 8: Coding Synchronized Slides
Code Samples
Throughout our book, each chapter has code prepped if you want to start with that chapter and follow along, or if you want to see an example of our completed code at the end of the chapter. You certainly don’t have to do it the way we did, but it’s a helpful guide if you’re having any problems. By the way, this is a node application, so you’ll need to already have node installed and some familiarity with it to jump into this code. If you’re not familiar with Node, our book does provide a brief intro to Node and Express so you can still use the book without prior experience. Assuming you have node installed, then you can start the app by running «node server» in the root directory.
Prerequisite code for this chapter:
https://github.com/agilityfeat/webinar-tool/tree/designsetup
Completed code for this chapter:
https://github.com/agilityfeat/webinar-tool/tree/syncsetup
Introduction
In this chapter we are going to focus on synchronizing the slides between presenters and attendees. This means that when the presenter presses the Next or Previous buttons, or the number of a particular slide they want to display, then that slide should change on the presenter’s screen and all attendees’ screens using real-time messaging.
To see the full code for this chapter, check out this branch of the webinar-tool application:
https://github.com/agilityfeat/webinar-tool/tree/syncsetup
Setting up the Presenter “login”
The first thing that we need to do is determine if a webinar user is the presenter or an attendee. Only presenters will have the power to change slides. Only attendees have the power to post comments.
If you’re going to take the code from this book and make a proper webinar tool, then you should put in some real security with actual authentication. But I’ve always been a big fan of not bothering with the mundane things like logins until you have to, because logins are not that valuable by themselves.
Since this book is not about user authentication models and I don’t want to waste your time with that, we’re going to do a cheap trick to determine if someone is a presenter or not.
After this chapter, if you are an attendee, you access the application locally this way:
If you are a presenter, you should access it this way:
http://localhost:3000/presenter
That’s it! It’s not exactly secure, but it’s good enough for our learning purposes in this book. We’re just setting this up in the routes for our application:
In the routes/routes.ejs file, we’ve just added an additional route for ‘/presenter’ underneath the root URL route. Both will render the index.ejs file.
Then in our webrtc.agility.js file (this is the primary javascript file we’re putting the code for our book in), we’ve added a variable “isPresenter” to the agility_webrtc definition, and then in the init() method:
Now we can access the isPresenter variable anywhere in the layout to determine which view we should show the current user, and what functionality they can use.
Changing the responsive layout based on Presenter/Attendee view
If you recall what the webinar tool looked like after the design chapter, you were seeing only the presenter’s view. The next/previous buttons should not be visible to attendees, and the circle icons for each slide should only have a click event for the presenter. In the templates.html file, this is handled just by checking that isPresenter variable:
In addition to the slide controls, we should also go ahead and change the rest of the template for the upcoming chapters where we are dealing with attendee voting and comments. Those controls should only be visible to attendees, not to presenters. That is also handled in the templates.html file with our isPresenter variable:
This is what the Attendee’s view should look like now:
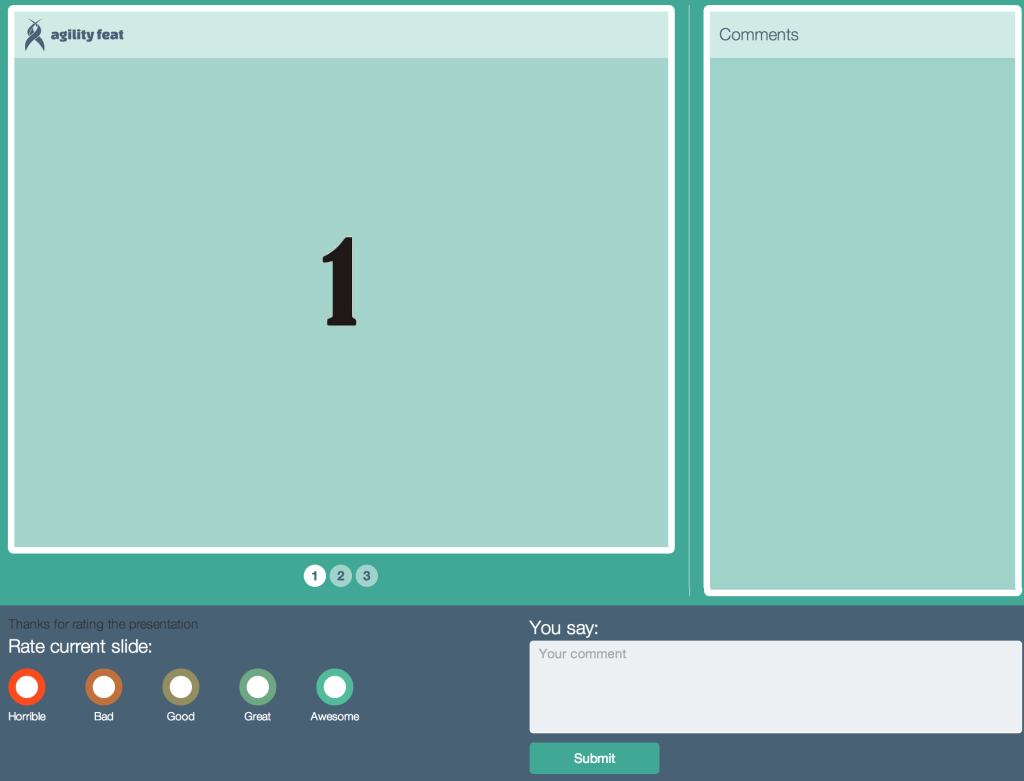
Attendee view after handling for isPresenter
Note that the “Rate Current Slide” and comment box controls are visible to the attendees, but the Previous/Next buttons are now hidden.
For the presenter, the bottom of the screen should now look like:
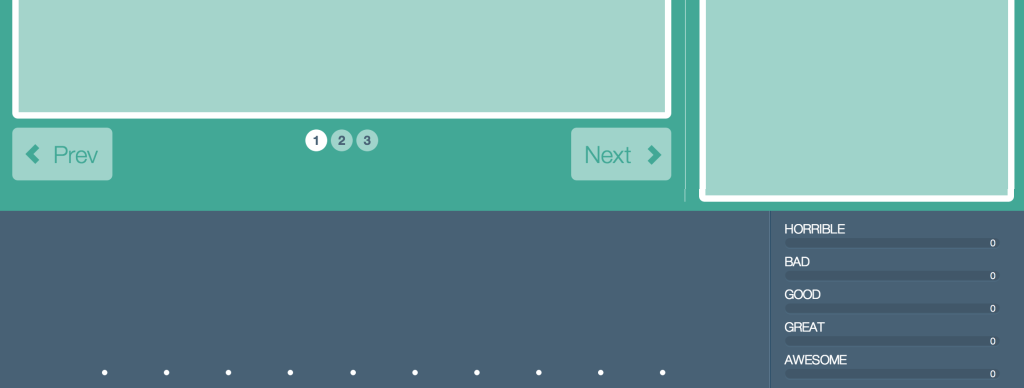
Bottom part of the Presenter’s view after isPresenter variable implemented
Note that the Previous/Next buttons are back, and along the bottom we have some placeholder html for the eventual voting result displays.
Changing slides
Now that the controls are all placed on the page properly for our presenter, it’s time to hook them up to some code to change the slides. In our webrtc.agility.js file, we have added two functions to a setBinds method.
The first method will bind a function to the “onclick” event of any control with the class “.control” attached to it. If you look closely at the layout from our templates.html file above, you’ll see that only the Previous and Next buttons have the css class control attached to them:
Here is the first method for binding the Previous and Next buttons:
Notice that this function sets an is_next variable based on whether or not the button that generated the “onclick” event also has the “nextSlide» class attached to it. In this way we can use one event handler for both buttons and just determine the command based on attach CSS classes. If you wanted to add more buttons to the UI for some reason, this allows you to do that only in the templates file without additional code bindings needed (although we wouldn’t recommend filling the screen with extra controls!).
The rest of the method just determines the right number for the next slide, and then sets the image carousel to use that number slide.
There is one more function we want to add to the setBinds method. In addition to the Previous and Next buttons, we have also put a set of numbered circles on the layout inbetween the two buttons. Each numbered circle represents a slide in the presentation deck (more on where those are stored later).
To make those circles bind to a function for navigating directly to that slide, we also add this function to the setBinds method:
The code is simpler in this case because we know exactly what number slide we want to navigate to.
Synchronizing the slides across clients
There’s one last thing we haven’t explained yet about the code above, but you probably already noticed it. When you hit any of the slide navigation controls, the function ends with a method like this:
In either function, we are going to publish a message to our channel with a type of “SLIDE” to indicate a slide change. We have stored the slide number that we want everyone to switch to in a variable named “slide_to”, and we’ll pass that value on the channel as well.
Back up in the init() function of our webrtc.agility.js file, we’ve added a statement to subscribe to the pubnub channel:
Now whenever a message is published to the channel, everyone subscribed will receive a callback to the onChannelListMessage method. This callback method is defined in our agility_webrtc variable as:
We’ve setup this method to use a switch statement, where each case will be one of the possible message.type’s that we implement in our application. For now, we are only implementing “SLIDE” in order to change the slides. If a message with any other type is published, it will be ignored.
That SLIDE message will then call a method changeSlide(slide_number), which we have implemented right above the onChannelListMessage() in our code.
This final method for changing the slides is pretty straightforward. The options value that you pass in is the slide number to change to, and so the carousel holding the presentation images is set to switch to that slide number. We’ll go to slide number one if no options are passed in.
We’ll also change the value of an active_index variable, and use that at the bottom to add a CSS class called “active” to the appropriate circled number underneath the slides, so that we can show which one is the currently selected slide.
Testing the slide synchronization
At this point, your code to change the slides is complete. If you run “node server” and navigate back to the application at localhost:3000 in two different browsers. Use the http://localhost:3000/presenter/ URL in one browser, and in the other, just use the base URL http://localhost:3000/. If you are opening both in a Chrome browser, then open one URL in «Incognito Mode» so that you have two distinct sessions.
In the presenter view, you should see the navigation controls. Press any of the controls and you should see the slides change in the presenter’s browser. We have put three simple placeholder slides in the application, each with the same number in the slide graphic so you can easily see the changes.
As the presenter is changing slides, you should also see the same slide changed in the regular attendee browser window, with only a momentary delay. Notice again that the attendee has no navigation controls, and that the circled numbers showing which slide you are on are not clickable for attendees.
If you’re having any trouble getting this to work, you’ll want to fix that before moving on to subsequent chapters. These are the problem areas to look out for:
Browser type – Although PubNub supports any recent modern browser, our code is optimized for Chrome and Firefox. Try one of those if you have problems with other browsers.
PubNub keys – Remember that you need to update our sample code with your own publish and subscribe keys from PubNub. The variables containing those keys are located near the top of the webrtc.agility.js file. Just search on “your pub key” and you’ll find the credentials declaration. Remember that anytime you refresh your code from one of our branches in this project, you’ll need to put your keys back in so keep them handy.
Javascript errors – If you’re still having trouble, open the Javascript console in your browser (In Chrome, this is accessed by View->Developer->Javascript Console). You need to have a working internet connections, or you will see errors loading the pubnub.js file, and that the PUBNUB variable is not declared.
You can get a copy of our code for this chapter on the following branch, it’s always a good idea to compare your implementation to that or to just use our code as a base for future chapters:
https://github.com/agilityfeat/webinar-tool/tree/syncsetup
There’s one last fun thing I recommend you do now. Remember how the presenter on a mobile device has their own special layout with Previous and Next buttons? If you have your code deployed on a publicly accessible URL or IP Address, then you can bring up the presenter’s view on your iPhone. Pressing the Previous and Next buttons from your phone will now send the same slide synchronization messages to all connected users.
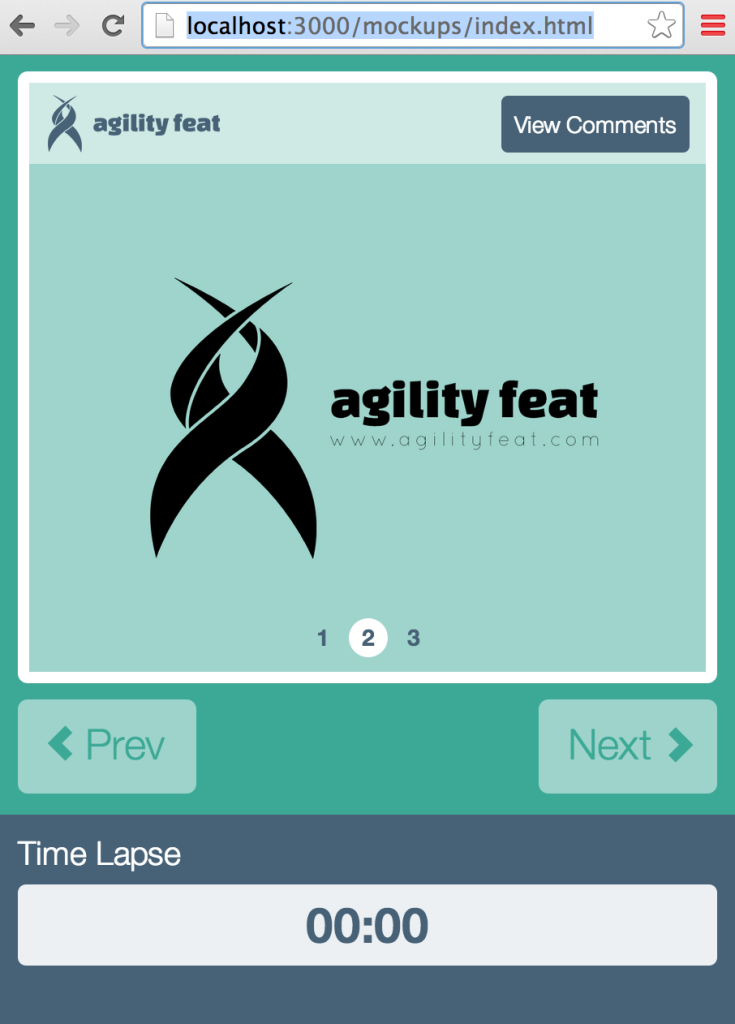
Presenter’s mobile view with navigation controls
I like to do that when using this tool at conferences. From my laptop, I bring up the presenter view and project it on a big screen. Attendees at the talk are looking at the slides from their mobile devices on an attendee view. I then use my iPhone from the Presenter’s URL and I can show them how pressing the Next button on my phone will advance the slide on the big screen and on their mobile devices. It’s a cheap way to get ooh’s and ahh’s!
Adding your own slides to the tool
It’s all working now, right! Excellent. But those three boring slides we put in our only good for testing the application. They don’t make for a very good webinar.
We’ve kept this application intentionally simple, and the presentation is just a series of numbered images stored in the public/images/presentation folder. If you want to change the slides, just update or add to those images.
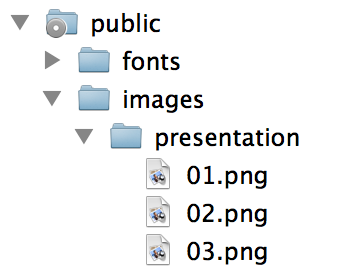
After putting in the appropriate image files, you also need to make the application aware of them. Look near the top of the webrtc.agility.js file for this declaration of the slide_pics:
Just add/remove images to the slide_pics and you will be all set! We’re using png’s that resize well, so you if you’re going to use this webinar tool for anything more than fun, make sure you pay attention to how the presentation images you use look on browsers, mobile devices, and maybe even projectors.
That’s it for synchronizing slides! If you’ve got some time on your hands and want to enhance what we’ve done in this chapter, consider allowing presenters to upload their own images, change the order of them, or allow the display of powerpoint files natively.
Pick up your own copy of this e-book
Now that you know how to do the basics of synchronizing the slides in our webinar tool, you probably have everything you need to build a simple real-time messaging application. If you interested in seeing more examples like this, or you want to go the next step and learn how we incorporated video and audio chat into our webinar tool, then make sure to check out our e-book «Building Real-Time Web Applications using Node.js, Pub/Sub networks, and WebRTC.» And to keep up with the best posts about real-time technologies across the web, please join us every week at RealTimeWeekly.com.

Recent Comments